


Semantic Turkey User Manual
Index
- Requirements
- Installation
- First Start
- Populating the ontology by dragging information from web pages and "bookmarking" them
- Pure Ontology Editing functionalities in Semantic Turkey
- Import Management Panel
- Visualization Level
- Repository Management
- OntoGraph View
- Option Panel
Requirements
Semantic Turkey has very low requirements for being setup for work:
- Firefox version 2.0 or above (ST works also with the new Firefox 3.0)
- an istalled JRE (Java Running Environment) version 5.0 or above featuring Live-Connect support (java plugin must be properly installed in Firefox)
Installation
Semantic Turkey can be installed as any standard Firefox extension in a very easy and fast way.There are two possibilities: either you click on the "install" button from the Semantic Turkey home page in the extensions library site of Firefox, or you download the xpi (eXtension Package Installer) from this project site.
In the first case, you will be immediately prompted for installation, while, in the second one, you have just to drag&drop the xpi file onto an open Firefox window or any Firefox icon on your computer. In either case, a dialog window like the one below will appear: you have just to click on “Install Now” and then restart Firefox.

Checking that Semantic Turkey is working properly
Once Firefox has restarted, you could get an error dialog like the one below (text of reported exception may vary...)

This may happen because of some problem with yor java plugin for Firefox, and are probably not directly related to Semantic Turkey
Should you get this error message, you may refer to the Firefox-Java Help page for resolving your specific problem
otherwise, go along with this reading!
First Start
The first start section is thought for people not familiar with Semantic Web standards and ontology editing tools. Anyone who has already used tools such as Protege or TopBraid Composer will probably feel acquainted with the main ontology editing functionalities of Semantic Turkey
Choose a BaseURI and RDF triple store for your ontology
Once Firefox has restarted, it's time to choose an URI for your ontology. For people with little or no knowledge about XML/RDF/OWL technologies, consider that this is just an identifier for the ontology that you will edit and populate through Semantic Turkey. It is required that this identifier conforms to URI standard format, but it does not need to refer to any physical resource available on the Web. It just represents the ontology which is being edited by you and which resides solely in your computer.
Also, you can choose among different triple store technologies (the technology which is in charge of storing and retrieving RDF data from your ontological repository). By default, Semantic Turkey is bundled with a wrapper from its ontological API to the Sesame 1 RDF framework; however, further RDF store solutions may be plugged to the main system provided that an analogous wrapper is being developed for them. Should two or more RDF triple store components be plugged to your installation of Semantic Turkey, you could use the radio buttons to select the one you prefer, otherwise, Sesame is the only allowed option.
Activate the Semantic Turkey Sidebar
After you have installed Semantic Turkey, open the Firefox Tools menu, expand the “Semantic Turkey” option and select “Ontology Panel”

A sidebar will open containing a tab panel showing the classes and instances view. Since your ontology will be empty when you have just created it, you will see two empty boxes for both the classes and individuals view

To have a fast-check that everything worked during installation, open the property panel: it should show a list of standard owl properties which are available in your ontology (figure below)

Import your first ontology
Note: you can skip this section if you already know what you are doing (you already have experience with Semantic Web technologies)
There is no strict need of importing an ontology for managing your ontological bookmarks; you can edit your personal ontology from scratch. However, to start from a ready-to-go example, let's import a sample ontology (you must be connected to the internet to do son).
Open the Imports Management Panel (Tools-->Semantic Turkey-->Imports Management). This panel (which will be described more in details later in this documentation) should look like the one in figure below:

Select, as shown in figure above, the option "Add Import from Web to Mirror". A dialog like the one below will appear, prompting you to insert the uri of the ontology that you would like to import, and elect a file in your file system for mirroring its content

Insert the URI: http://art.uniroma2.it/ontologies/st_example
and choose a name, for example: st_example.owl, for the file which will be stored in the ontology mirror of your computer
If everything is going right, Semantic Turkey should reassure you that the ontology has been imported and an entry should appear in the Imports box of the Imports Management Panel.
Note: if you are behind a proxy, you have to set proxy preferences both in Firefox (Tools-->Options-->Network) and in the Java Control Panel. Firefox rules over normal navigation while the Java proxy settings are necessary for importing ontologies. In the future, we will probably make Semantic Turkey java components inherit Firefox proxy preferences and override those defined in the Java Control Panel
Add a prefix for your imported ontology
Now, look at the table above the Imports box, which contains mappings between namespaces of imported ontologies (and namespaces related to XML/RDF/RDFS/OWL technologies) and related prefixes. Prefixes as a short-hand notation (inside a given space, like your working ontology, for example) for addressing namespaces. So, for example, if you used the prefix stx for the namespace: http://art.uniroma2.it/ontologies/st_example a concept from st_example called http://art.uniroma2.it/ontologies/st_example#Person could be shortly refered to as stx:Person. If you do not find an entry for your namespace in the prefix-namespace mapping table, you'd better enter it manually. You can do that by pressing the button on top of the prefix-namespace mapping table, called "Add Prefix", and edit the prefix namespace mapping in the following form:
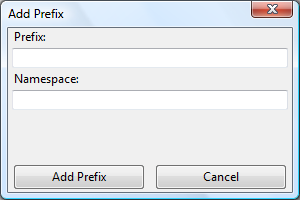
it is important that you write the full namespace, that is, the baseuri plus the final # symbol, so: http://art.uniroma2.it/ontologies/st_example#
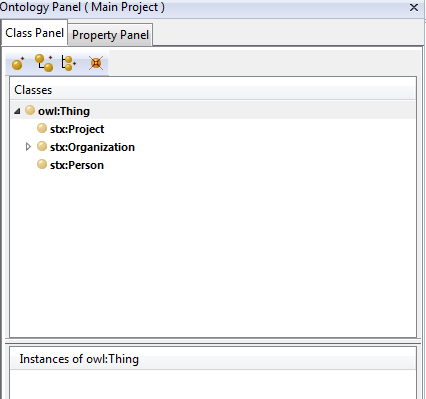
Now, if you go back to the class panel (Tools-->Semantic Turkey-->Ontology Panel), it should appear much like in the following picture:
Now everything is ready to let you build your own ontology. The following section tell you how to drag textual information from visited web pages to populate your ontology with objects, to describe them, declare relationships between them, and to keep track of their references to web pages. Finally, the last section gives more details about the pure ontology editing functionalities which are available from the Ontology and Imports Management panels
Populating the ontology by dragging information from web pages and "bookmarking" them
Semantic Turkey offers a few drag&drop functionalities for easily get information from web pages and use it to populate the ontology. Additionally, the reference to the source web pages where the information is extracted, is kept inside the ontology repository so that an immediate "bookmarking" facility is made available. This combination of operations, which involves the creation of 4 to 7 rdf triples (depending on the kind of functionality which is selected) with a few point-and-clik actions, eases a lot the ontology building process and let the user concetrate on its task, whether he is an ontology engineer or just a web user willing to use more advanced forms of bookmarking
Drag&drop text to create an instance of a class
You can drag and drop a selection of text from a web page displayed in the browser on the icon of a class to create an instance of that class. The selection will become the local name of the new individual, the instance counter for that class (the number between parentheses near the class icon) will increment by one and the new individual icon will be shown in the instance panel

You drag'n'drop operation, other than creating the individual, has also created a link between it and the web page. If you right click on the individual and choose the "weblinks" option, like in figure below:

a window like the one below will open, offering all the web pages which contain material related to this individual. As you can see, your knowledge remains well organized and free of any redundance, while you can make explicit as many links as you want between web pages and objects. Also, web pages are reified insire the ontology, and you can as well get all the individuals which are linked to a given web page

The linking between objects and web pages is registered in the ontology repository, and its elements are defined according to the "Semantic Annotation" ontology, which is hidden to the user (this ontology, and its instances, can be made visible through the menu option "Tools-->Semantic Turkey-->Visualization Level-->debug")
Drag&drop to add a property value to an instance
You can drag and drop a selection of text from a web page over the icon that represents an individual, in order to add a value to a property for that individual.
In the example, the research interest: "Knowledge-Based Systems" is being dragged over the individual: "Armando Stellato".
A dialog, like the one in figure below, will open, prompting the user to choose the fitting property.

The dialog in figure will initially show all the properties which are typically associated to the type of individual you're characterizing (in technical terms: those properties whose domain contains one of the classes which are types for the selected individual).
You can mark the option “Show all properties” (like in figure above) to view all the properties contained in the ontology. Maybe the one you're looking for is not a typical characteristic of the type of individual you're considering, nonetheless it can be used to add an attribute to that individual description.
If you're following this example, you can scroll the list until you find the "interest" property.
It is showed in green because it is a datatype property, that is: an attribute, represented by a primitive datatype (a string, integer...) which adds more information to the description of the individual.
Now, if you double click on the icon of the instance, you will see the individual-view window, like in figure below

As you can see, the description of "Armando Stellato" now contains also his interest on "Knowledge-Based Systems"
You can also choose different kind of properties. Yellow properties (Annotation properties) can be used to provide useful annotations about your ontology; their values can be characterized by the language in which they are expressed (which is prompted for by the application): you can use, for example, "rdfs:comment" to add documentation about what a given class may represent or "rdfs:label" may represent additional linguistic descriptors for the same object (synonyms, translations).
Blu properties with the white vertical stripe are instead called Object Properties and express relationships between existing objects of your domain. For example, in the previous page if you select "University of Rome, Tor Vergata", and then drag it over the individual "Armando Stellato", like in in picture below:

and the select the "stx:worksIn" property, as in picture below:

you will be prompted with the following screen:

You can now, with one simple operation (by choosing a class on the left part of the window and clicking on the "Bind to new individual..." button):
- create a new object, named after your selected text fragment, typized after the class you selected in the last panel
- related this object to the selected individual (the one where you dropped the selection) through the selected property
- add a link between the newly created object and the web page where you found it
You can also select an existing object (from the panel on the right, showing existing individuals for each class), and press the "Add new annotation..." button. In this case, only operations 2 and 3 will be performed on the already existing object.
Drag'n'drop to add a futher annotation to an existing object
Go to site: http://www.ingegneria-online.it/?q=node/12 and then drag again "ARMANDO STELLATO", but this time drop it on the already existing instance (figure below)

now, when the dialog below appears, choose the different option from the radio buttons: “ "Armando Stellato" is a further annotation of "Armando Stellato" ”

With this action, you added a further weblink to the individual "Armando Stellato", which can be inspected, as usual, from the "WebLinks" described above.
Pure Ontology Editing functionalities in Semantic Turkey
The functionalities described in the previous section facilitate the user in the process of developing an ontology, or just help people willing to maintain smarter bookmarks for their browsers.
People may however need to add knowledge gathered from other information sources, or revise/delete those already present in their ontology. For this reason, Semantic Turkey provides basic ontology editing functionalities for managing your personal ontology. We describe the main editing panels of Semantic Turkey, and provide a list of their usable components together with a description of their usage.
Class Panel
The Class Panel is actually composed of two main widget components: the Class box and the Instances widget, showing the instances of the currently selected class. In the first it is possible to edit the classes of the ontologies.

The possible editing operations that can be used with a click on the icon above the classes subpanel are :
![]() Create Class: adds a class at the root level of the ontology;
Create Class: adds a class at the root level of the ontology;
![]() Create SubClass: adds a class as a subclass of the selected class;
Create SubClass: adds a class as a subclass of the selected class;
![]() Create Sibling Class: adds a class as a subclass of the super class of the selected class;
Create Sibling Class: adds a class as a subclass of the super class of the selected class;
![]() Delete Class: deletes a class. It is not possible to delete classes containing instances nor classes belonging to an imported ontology (imported ontologies are read only);
Delete Class: deletes a class. It is not possible to delete classes containing instances nor classes belonging to an imported ontology (imported ontologies are read only);
![]() OntoGraph view: opens an applet in a new Firefox tab showing a graph representing the current ontology.
OntoGraph view: opens an applet in a new Firefox tab showing a graph representing the current ontology.
Class context menu
If you right click over a class, a context menu like the one here below:
will provide class-specific operations like:
![]() Create Instance: adds an instance to the selected class;
Create Instance: adds an instance to the selected class;
![]() Modify name: changes the class name (again, not possible for classes of imported ontologies);
Modify name: changes the class name (again, not possible for classes of imported ontologies);
![]() Add Synonym; adds a synonym to the selected class;
Add Synonym; adds a synonym to the selected class;
![]() OntoGraph view: prints a partial graph of the ontology centred on the selected class.
OntoGraph view: prints a partial graph of the ontology centred on the selected class.
Instance context menu
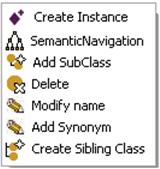
If you right click on an instance icon, the context menu in figure below will appear
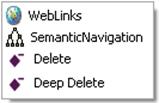
showing possible operations on the instances:
![]() WebLinks: opens a window that contains Urls Web Pages of the selected instances if it is an instance created with drang&drop from Web;
WebLinks: opens a window that contains Urls Web Pages of the selected instances if it is an instance created with drang&drop from Web;
![]() Semantic Navigation: print a partial graph of the ontology about the type of the selected instance;
Semantic Navigation: print a partial graph of the ontology about the type of the selected instance;
![]() Delete: deletes the selected instances;
Delete: deletes the selected instances;
![]() Deep Delete: deletes the selected instance and the information correlated to it, for example the value of the property who have relationship only with the selected instance.
Deep Delete: deletes the selected instance and the information correlated to it, for example the value of the property who have relationship only with the selected instance.
Property Panel
The Property Panel shows the properties of the current ontology (working ontology plus imported ones)
Imports Management Panel
The Import Management panel is divided into three main areas
- The baseuri and default namespace of the current ontology
- the namespace-prefix mapping table
- The Imports tree
As previously told, the baseuri is a resource identifier for the whole ontology. When an ontology serialized with local names is loaded by any kind of RDF application, these names are resolved to full URIs by combining them with the baseuri of the ontology. The default namespace is instead used when resolving prefix-based qualified names to URIs, usally needed by application user interfaces (e.g. when showing resources in Semantic Turkey) and, in particular, is associated to the empty prefix. Other prefixes are instead resolved through a look-up over the prefix-namespace mapping table (second section of the Import Management Panel). As an example: owl:sameAs is resolved to http://www.w3.org/2002/07/owl#sameAs, while, in our sample ontology, Armando Stellato, being without prefix, is resolved, through the default namespace, to http://foo.bar/myontologies#Armando Stellato. The default namespace is initialized by the application, during the first start described before, to baseuri + #, so, in our example, it has been set to http://foo.bar/myontologies#. However, you can change both and decide if keeping them separate or not (the lock icon allows you to bind the values of baseuri and default namespace, thus coordinating changes in the names of both).
Through the bottom box in the panel it is possible to import ontologies and view the current import status.

Here below we report the four different options for importing ontologies:
- Add Import From Web: To import an ontology from the Web the user has to write the URL in the appropriate field “Base Uri”. A copy of the ontology is not saved locally so it is downloaded again each timeFirefox will be restarted

- Add Import From Web To Mirror: To import an ontology from the Web and mirror it inside Semantic Turkey. A note about the concept Ontology Mirror: Semantic Turkey has a local cache of ontologies which are downloaded from the web. More precisely, there is a cache which is automatically filled when the user downloads ontologies from the web, restarts the application etc…, while there is a stable repository where ontologies are kept where expressly decided by the user, called Ontology Mirror. When the user wants to import an ontology, if its baseuri is reported in the mirror, the cached one will be imported instead of downloading it from the web.

- Add Import From Local File: To import an ontology stored in the local computer but not stored in the ontology mirror.

- Add Import From Ontology Mirror: To import ontologies already stored in the mirror.

Visualization Level
Semantic Turkey offers two different visualization levels: normal and debug. If you set normal, the ontology panel will show only the working ontology and the imported ontologies otherwise, if you set the visualization level to debug, elements from the Semantic Annotation ontology will be shown too.Repository Management
The Repository Management menu provides functionalities that help you manage your repository: it is possible to clear the repository, to export it into an rdf file and to load an external rdf file that will be added to your working ontology (so it differentiates from a traditional import which is readonly). The last option opens the Ontology Mirror Management window, which is descrisbed here below
Export Repository
If you choose Export Repository, the window below will be opened, prompting you for the directory where you want to export your ontological repository and for the name of the saved file. You can use any extension for your file (but we recommend rdf or owl extension, which are normally associated to rdf content).

Load Rdf
If you have a valid rdf file, you can load it into Semantic Turkey using Load Rdf option in Repository Management menu. Through the Load Repository window you can browse your file system to select the file to be loaded, and specify its baseuri. Note that the file content will be loaded inside your working ontology, so you will be able to modify it. This is the main difference with respect to the import options on the Import Panel which allow to reuse existing ontologies by importing their content in read-only. This option is typically used to reimport data which has been previously backed up from your old repository, or to exchange ontologies with other people.

Clear Repository
Through this action, the ontology repository will be completely cleared.
Pay attention to this action because it erases all information in your repository (we recommend to export the existing repository before clearing it).
After cleaning the repository, Semantic Turkey restarts Mozilla Firefox, and will again prompt you with the first start panel
Manage Ontology Mirror
By choosing Manage Ontology Mirror, the Ontology Mirror Management will be shown. This window shows the complete list of ontologies which are mirrored in your computer. The mirrored ontologies appear as <baseuri, mirrored file> pairs. You can delete an ontology from the mirror (in this case, if that ontology is imported in your working ontology, Semantic Turkey will try to import it from the web the next time it is started), or update its content (in case it has been modified after you mirrored it). If you choose to update, you have three options
- update from Web (using baseuri as location): Semantic Turkey tries to retrieve a new version of the ontology by downloading it from an URL equivalent to its baseuri
- update from Web (from alternative URL): the ontology is downloaded from an alternative URL which the user is prompted for
- update from Local File: the ontology is updated with the content taken from a local file in your machine
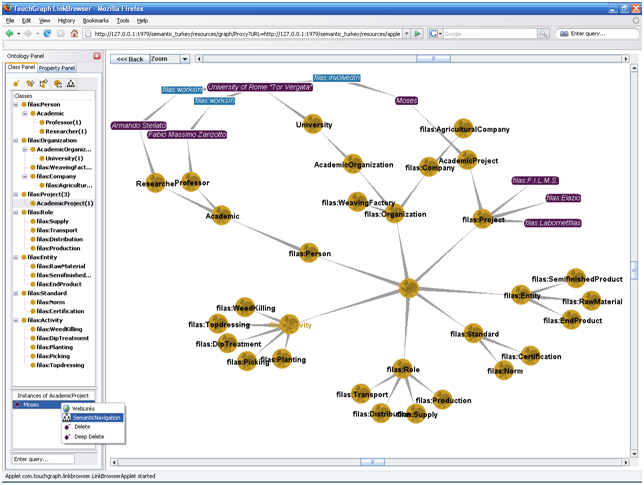
OntoGraph View
Semantic Navigation option can be accessed from both classes and instances subpanel as an additional feature, letting the user graphically explore the ontology. A Java applet will be loaded on a new tab of the browser displaying the graph view of the ontology, allowing the user to navigate its content and get back to the pages related to the annotated knowledge. Conversely, Semantic Turkey reports to the user, through a dedicated status bar, the pages which have been previously annotated. When the user visits an already annotated page, an icon with the shape of a pencil is being shown in the lower part of the browser. If the icon is being clicked, the html text entries that represent the past annotations will be emphasized (providing the page still containing those entries) with a light background color.
Option Panel
Options Panel can be accessed from the options button of Semantic Turkey extension in the addons window of firefox. The Options Windowl contains two tabbed panels: the Languages Options Panel and Annotation Options PanelLanguages Options Panel
This panel lists available languages which can be used in annotation properties. There is also an entry with the default language, the one which is prompted first when the user is prompted for languages. All the entries can be edited by the user.

Annotation Options Panel
This represents the list of registered annotation functions. By default Semantic Turkey gives only the (Semantic) Bookmarking annotation option. More annotation functions can be added by Semantic Turkey extensions. For more information implementing an extension, see the Extension Points section in developers documentation
